How to Fix Valorant Secure Boot Error (VAN -79): Complete Guide for Windows 10 & 11
Paramount Tech Solution
Paramount Tech Solution
Do you get VAN-79 errors when trying to play on Windows 10 and 11, and does it frustrate you? It appears to be caused by Valorant's anti-cheat software, which requires secure boot to be enabled.
Valorent is developed by Riot Games. It uses Secure Boot and TPM (Trusted Platform Module) 2.0 requirements as part of its Vanguard anti-cheat system to prevent cheating. It also helps in keeping game integrity.
These security measures impact various systems, including Windows 10 and Windows 11, as well as popular motherboard brands such as Gigabyte, ASUS, MSI, Dell, and HP.
If you can not play the Valorant game due to a secure boot error, you can fix it quickly. With years of experience in troubleshooting BIOS configurations and gaming setups, this expert-led blog will help players resolve this exact issue.
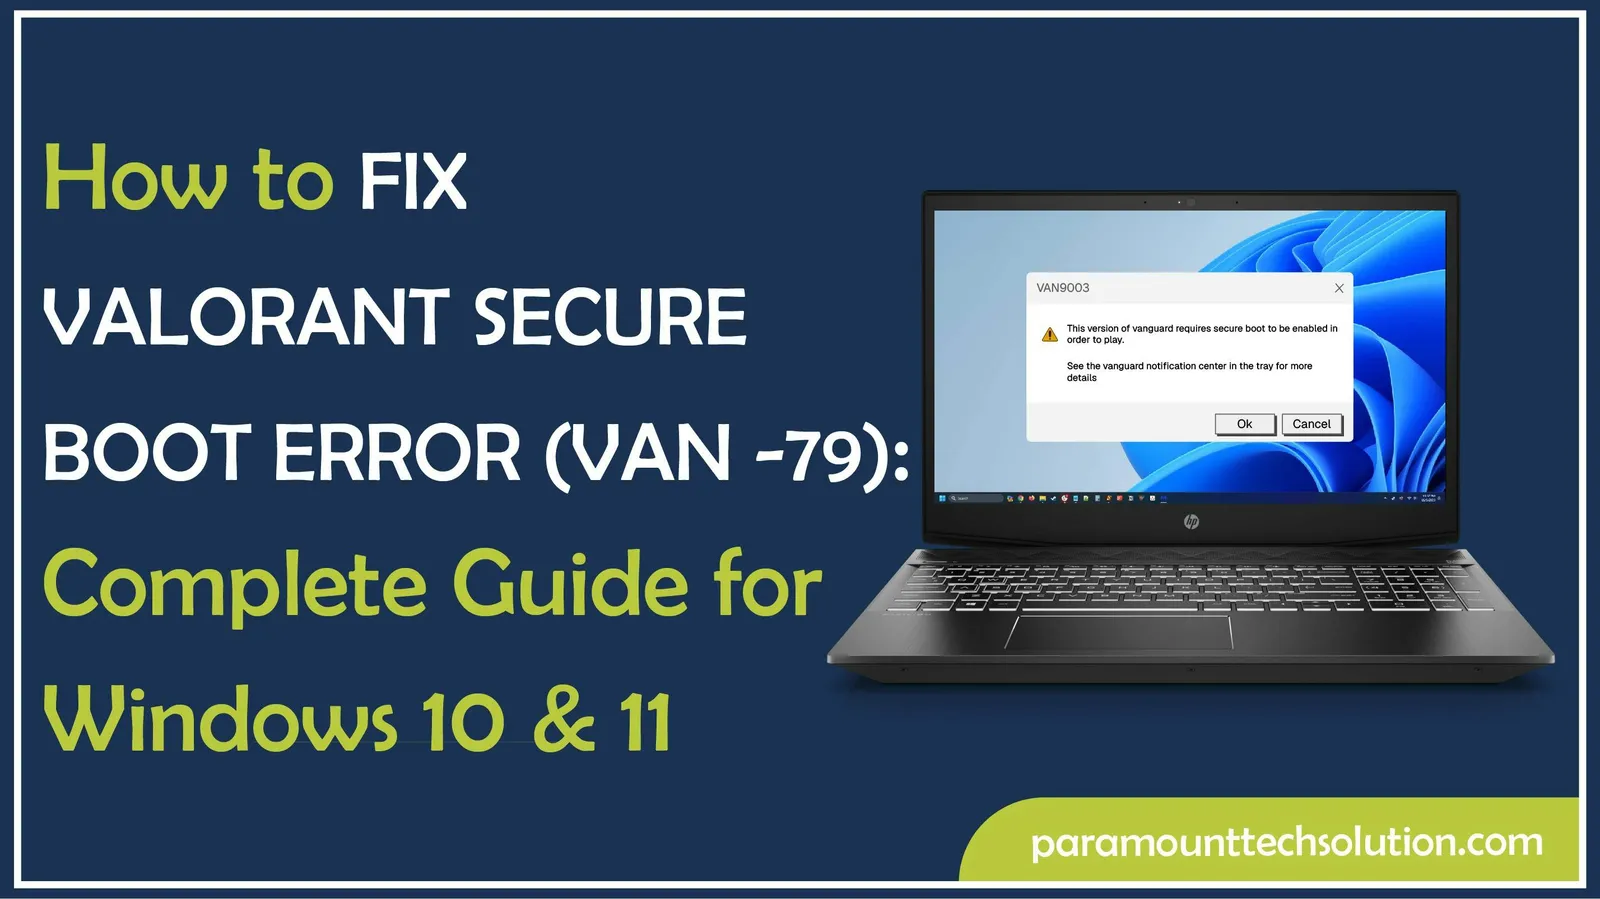
The Valorant secure boot error is an error message that appears in Windows 10 and 11 when trying to play the Valorant game on the system. It arises when Valorant's anti-cheat system, Vanguard, requires secure boot and TPM 2.0 to be enabled on Windows.
This important security feature prevents cheating and ensures the integrity of the game environment. If secure boot or TPM 2.0 is disabled on your system, the error message will be displayed, and Valorant will not launch.
The VAN-79 error code appears when your system does not meet the required security standards to run the Valorant game. There are several reasons for this error code to be displayed.
The error code may appear as VAN-79 or written as Valorant requires TPM 2.0 and Secure Boot to be enabled.
The primary reason for Valorant to use secure boot and TPM 2.0 is to enhance game security and combat cheating. Riot Games implements these requirements through its Vanguard anti-cheat system. There are several reasons to use these security measures;
According to Riot's official documentation, the Vanguard operates at the kernel level. Therefore, it requires security measures to maintain the integrity of its anti-cheat detection features.
You can check the Secure Boot and TPM status on Windows through the System Information tool (msinfo32). Press Win + R, search msinfo32, and see if it shows as enabled.
To verify secure boot using misinfo32, follow these steps.
Step 1: Press the Windows key and type msinfo32, then press Enter.

Step 2: Find the "Secure Boot State" in the system summary. If it shows ‘On’ or ‘Enabled’, the Secure Boot is active. If it shows ‘Off’ or ‘Disabled’, you need to enable it.

Step 3: Verify BIOS Mode. It should show "UEFI" for Secure Boot compatibility. If it shows "Legacy," you need to change to UEFI mode.

You should check the TPM status before launching your Valorant game. You can check it by following these steps;
Step 1: Press Windows key, type tpm.msc, and press Enter.

Step 2: Check the status. Ensure the status shows ‘Ready for Use’.

BIOS-Level Verification: You can also check TPM status in BIOS settings. It appears under the Security or Advanced tabs.
If your Secure Boot is not enabled, you can enable it for Valorant by accessing your computer's BIOS/UEFI settings. There, you can enable the Secure Boot option.
We will guide you step by step on how you can enable secure boot for Valorant in Windows 10 and 11. We will start with Windows 11 first.
You can fix the Valorant secure boot error on Windows 11. Generally, Windows 11 systems have better Secure Boot support. But the process varies by motherboard manufacturer. Follow these simple steps to enable secure boot.
Step 1: Restart Your Computer
Restart your computer and press F2 or Delete repeatedly during startup.
Step 2: Select Advanced Options
Once your PC restarts, you will see a blue screen and several options to choose from. Select the ‘Advanced Option’.

Step 3: Select UEFI Firmware Settings
Under the advanced options, click UEFI Firmware Settings. Your computer will restart immediately and enter the BIOS. You can move to the next step.

Step 4: Find Secure Boot Settings
Locate the secure boot setting in the security or boot settings and enable it. However, different motherboards possess different BIOS mechanisms. If you can not find a Secure Boot Setting, consult your manufacturer's website or your computer manual.

Within the BIOS/UEFI, you need to enable the TPM 2.0.
Step 1: Go to the Security tab within BIOS.

Step 2: Find the TPM setting and click it.

Step 3: Enable TPM 2.0. Press the Enter key to toggle on TPM 2.0. Now, press F10 and save your settings. Exit BIOs and restart your computer.

You can enable Secure Boot for Valorant on ASUS motherboards by accessing the BIOS settings. It involves the following steps;
The secure Boot can be enabled on MSI motherboards by restarting the computer and accessing the BIOS settings. You can follow these steps to get secure boot enabled.
You can enable Secure Boot on your Dell system by accessing the BIOS settings during startup. Then select the Secure Boot configuration. These steps can guide you through this process.
The process to enable secure boot on HP systems involves the following steps.
If you can not play Valorant on Windows 10 due to a secure boot error code, you can quickly fix it. The Valorant secure boot error on Windows 10 can easily be enabled. Follow these steps;
Step 1: Open Windows Settings
Press the Windows button, search for ‘Settings,’ then open it.

Step 2: Choose ‘Update and Security’
A new page will appear with lots of options. Click ‘update and security’. You can find it at the bottom left.

Step 3: Click Recovery
Click the ‘Recovery’ in the left side of the page. Then click ‘Restart now’ under the Advanced startup tab. Your system will restart immediately.

Step 4: Select Advanced Option in Troubleshoot
Once your computer restarts, it will show a blue screen and several options to choose from.
Step 5: Select UEFI Firmware settings
Under the ‘advanced option’ tab, click UEFI settings. Your system will restart and enter into BIOS.
Step 6: Find the ‘Security’
In BIOS, find the ‘security’ and click it. You can find it at the top along with other options.

Step 7: Find the Secure Boot Option
Select the ‘Secure Boot’ and m enable it. You can use the arrow keys for navigation.

Step 8: Save the Changes
Press the F10 key to save your settings. After saving, exit the BIOS.
There are some common issues that appear due to enabling secure boot in your system. Here, we will guide you on how to troubleshoot common issues related to secure boot enabling.
h3> Secure Boot Enabled, But Error Persists
If you are encountering a Secure Boot error in Valorant, even though it is enabled in your BIOS, then the issue may be with the configuration.
How to troubleshoot it
If you try all these steps and are still facing issues, submit a support report to Riot Games for personalized assistance.
If you have enabled TPM 2.0 but still get VAN-79, the issue often lies in how TPM is implemented or configured. To troubleshoot this issue, you should know the type of TPM used in your system.
Firmware TPM (fTPM): It runs on your CPU and uses processor resources. While Discrete TPM: It uses a dedicated hardware chip on the motherboard. Different systems have different compatibility:
So, only TPM 2.0 being "enabled" does not promise proper function of Valorant. It needs correct implementation and clean configuration.
The Secure Boot implementation problems of Gigabyte motherboards affect the anti-cheat system of Valorant. These issues show security appears configured correctly, but fails Vanguard's strict validation. This appears due to BIOS bugs.
Incorrect Status Reporting: Sometimes, Gigabyte BIOS versions show Secure Boot as ‘Enabled’ in the interface. But the actual security validation fails at the firmware level. This error shows users that their configuration is correct, but Vanguard can detect the failure.
F4 BIOS Version Problems: Some critical Secure Boot bugs are found in the F4 firmware series of Gigabyte board models. These versions have incomplete key management systems and faulty UEFI certificate validation. It lacks the security chain required by the Vanguard.
BIOS Update Process: You need to download the latest firmware from the official support page of Gigabyte. Select the firmware compatible with your specific motherboard model.
Windows Features Toggle: Enable ‘Windows 8/10 Features' in the BIOS boot configuration of your system. It will activate proper UEFI mode. By doing so, you make sure that Microsoft security protocols are correctly implemented.
OS Mode Switch method: A common troubleshooting method involves temporarily setting boot mode to ‘Other OS’ and switching back to ‘Windows UEFI mode.’ This process forces the BIOS to reinitialize Secure Boot components and resolve the validation errors.
The main issue is that the early BIOS implementations of Gigabyte had incomplete Microsoft security standard compliance. Vanguard's enterprise-grade validation easily detects those issues and prevents launching Valorant.
With the F5 firmware release, Gigabyte has addressed most Secure Boot validation issues. The updates include proper Microsoft certificate handling, corrected security key enrollment processes, and improved TPM integration.
There are several advanced recovery methods that can resolve deeper system-level conflicts that prevent Valorant's Vanguard from validating security configurations.
The advanced fix for the secure boot error includes resetting BIOS settings safely. This process involves the following steps;
Step 1: Access BIOS setup during boot.

Step 2: Go to ‘Load Optimized Defaults’ or ‘Reset to Factory Settings.’

Step 3: Select ‘Yes’ and press Enter. It will start resetting your BIOS immediately.

Step 4: Save and exit, then power off your system completely.

Step 5: Remove the power cable for 30 seconds to clear residual power.
Step 6: Then reconnect and boot.
Step 7: This ensures a complete hardware state reset.
Reset BIOS when you have already made multiple configuration changes without success. Try it when Secure Boot shows conflicting status indicators. Also, reset if you experience boot loops and system instability alongside the VAN error.
You should take some precautionary measures while resetting the BIOS.
Post-Reset Configuration:
After resetting the BIOS, enable UEFI mode. Set Secure Boot to enabled and activate TPM 2.0.
The Boot repair tools are a utility that is used to fix issues preventing a computer from starting up properly. These tools address the problems with the bootloader, operating system files, and the Master Boot Record (MBR).
There are several Windows recovery options that can help troubleshoot and fix problems. Here are some of the options.
The Startup Repair is a common Windows troubleshooting tool. It can automatically fix some common issues that halt proper booting in your computer.

The system will restart. The Startup Repair starts scanning your computer for issues and tries to fix them.
The bcdboot command is a Windows utility used to configure a system partition with boot files and create a new BCD (Boot Configuration Data) store. Use bcdedit commands to rebuild boot configuration data. It ensures a proper UEFI boot chain.
You can run sfc /scannow to repair Windows system files that support Secure Boot functionality.
These advanced methods address deeper firmware and boot system corruption that standard troubleshooting can not resolve.
What Is Safe Boot vs Secure Boot?
Both Safe Boot and Secure Boot enhance the security and stability of a computer. But they operate differently. The Safe Boot is a diagnostic mode that starts Windows with minimal functions to help troubleshoot software or driver issues. On the other hand, Secure Boot is a security standard. It verifies the integrity of the boot process and prevents unauthorized software from loading during startup.
Can I Play Valorant Without Secure Boot?
No, you can not play Valorant without Secure Boot. Riot Games made this a hard requirement for Vanguard anti-cheat. If you attempt to play without secure boot, it will result in VAN-79 error codes.
How to Uninstall Valorant Safely?
To Uninstall Valorant and Vanguard on Windows Settings, go to Settings, find the ‘Apps’, locate ‘Apps & Features’, find Valorant and Riot Vanguard, and click ‘Uninstall’. It will be uninstalled.
What Is Error Code 90001 in Valorant?
Error code 90001 in Valorant is related to Vanguard's security protocols. It commonly appears on Windows 11. It requires secure boot and TPM 2.0 to be enabled.